")
")
company founded by Louis R. Wallace and David P. Darus. Basic 8 covered the need to extend the command set with new graphical commands. An interesting review of Basic 8 appears on Commodore Gazette and that I think it would be a good idea to report here:
From Commodore Gazette (June 1987, Year II, number 4) commodore cover magazine 7

One of the most interesting aspects of our profession is the possibility to view a large number of new products before they are even launched on the market. Despite this, I think that such privilege is not even comparable with the emotions and satisfaction that being involved in the design and implementation of a software package can give. Over the past year, I had the opportunity to realise these aspirations by taking part in the development of BASIC 8.0 dedicated to C-128.
Together with my friend and colleague David P. Darus, I have been involved in a series of software-producing projects for different types of machines. The most successful C-128 program to date has been Ultra Hires, a language oriented to the extension of graphic capabilities that efficiently exploits the potential of the C128's 80-column monochrome mode. This programme quickly became very popular: since it was published a year and a half ago, letters of congratulations have rained hundreds of times from all over the world.
As a result of the success of the audience and partly also because of our curiosity, we have decided to study the possibility of obtaining further results from the RGB graphic mode with 80 columns. After a few months of study we realized that Ultra Hires did not exploit, if not marginally, all the graphic capabilities of the Video Display Chip 8563, which manages the 80 column mode of 128. We thought it logical, therefore, to continue the research in this direction and, after almost two years of work (and more than 15000 lines of assembly code), BASIC 8.0 was born.
Since I have been part of the staff involved in the creation of the programme from the very beginning, I am certainly not able to offer an impartial and objective vision of the programme. This Article should therefore not be understood as a review in the strict sense of the term. I will limit myself, in fact, to describing the language and the ancillary programmes, distancing myself, as far as I can, from judgements and evaluations. However, anyone who may be interested in the details concerning this powerful graphic extension, after reading this piece, will be able to deal with their own evaluations.
BASIC 8.0 was designed and manufactured by David P. Darus and the writer. This is probably the first software package dedicated to the C-128 that fully exploits its full potential. It was primarily designed to allow those who program in Basic to access the colour graphics of the 80 column mode of the C-128 and offers possibilities that go far beyond the simple management of graphics.
The program uses the 80-column bitmap screen (capable of 640 x 200 dots resolution), but is not limited to a monochrome display, but allows the simultaneous use of sixteen colors. In fact, there are five different screen types available, each of which can take on any size you want. One of the screens is monochrome, while the others are all 16 colors. Colour screens differ in the size of colour cells. The color cell is a rectangular area that can contain two colors, one for the background and one in the foreground. On C-64 and C-128, the high-resolution screen uses colour cells of 8x8 pixels. With BASIC 8.0, colour cells of 8x16,8x8,8x4 and 8x2 can be used. In this way, programmers can choose the type of screen that best suits their specific needs. Of course, the smaller the size of the cell, the better the color resolution is, but at the same time the more memory space is allocated to the graphics.
Since the first version of the C-128 is equipped with only 16K of RAM dedicated to the 80 columns, there are limits to the management of color graphics. To use colour screens, you need to reduce the size of the screens to have enough RAM available to handle colors. The latest versions of the computer, on the other hand, have 64K of RAM VDC available (or they have replaced the two 8K VDC 4164 RAMs with two 32K RAM 4464s); this allows you to display full size colour screens or even screens larger than 640 x 200
Table 1 lists more than 50 commands contained in BASIC 8.0. Since many of them are also used to perform different operations, the actual number of new commands extends beyond that indicated in the list. I will now try to describe the operation of some of them, as it is not possible to examine all of them (the BASIC 8.0 manual contains almost 200 pages).
Table 1. Basic 8 commands
ANGLE
ARC
BOX
BRUSHPATRN
BUFFER
CBRUSH
CHAR
CIRCLE
CLEAR
COLOR
COPY
CYLNDR
DIR$
DISPLAY
DOT
DRWMODA
DRWMODB
FETCH
FLASH
FONT
GROW
HCOPY
LINE
LOGO
LSTRUCT
WINDOW OPEN
WINDOW CLOSE
---------------------------------------------
BASIC 8.0 is equipped with a command called SCRDEF (SCReen DEFinition) that allows the creation of graphic screens up to 2040 pixels wide and 819 high. You can specify the color mode to be used, a 0 to 7 screen number (which is used by the other commands to know which screen to operate on), the interlace mode and the RAM VDC address to be used for the screen. If you don't want to waste time defining your own screen, the MODE command makes 32 different predefined screens operational. In fact, it is sufficient to specify which of the 4 modes you want to use (each mode has eight screen definitions available). Mode 0 is designed to be used with 16K VDC RAM, while modes 1 to 3 take advantage of the superior capabilities of the new C-128 with 64K VDCs. Since we talk about a graphic language, there are obviously many commands dedicated to drawing. However, there are many unusual possibilities that make the BASIC 8.0 command set one of the most complete and powerful ever made. A special feature is that all the commands for drawing (LINE, CIRCLE, ARC, BOX and DOT) work in 3D. Unlike standard graphics programs, which only use the X and Y axes, BASIC 8.0 also uses a third Z axis and does not require tedious mathematical formulas to display or rotate graphical images in three dimensions. As a corollary to the drawing commands you will find a whole series of instructions designed to carry out the rotation of the images, change their origin and point of view. Another powerful graphic capability is guaranteed by the ability to specify a height value. This value allows the boxes to be transformed into three-dimensional bars, the arcs to be transformed into cake charts and brushes to take on any size you want. As in the Amiga, all graphic commands can take on different graphic matrixes. Just specify a matrix and activate the operating mode with DRWMODA. If the matrix is color, all drawings are displayed in color mode. Basic 8.0 has a BRUSH function that allows you to delimit a part of the screen of any size and turn it into a brush. The brushes created in this way can be retransferred to the screen, saved on disk, inverted or upside down. It is also possible to use the BRUSHPATRN command to transform a brush into a matrix, so that each image displayed on the screen can be transformed into a matrix.
There are also commands to handle solid objects in three dimensions such as balls, cylinders.... These solids can be bound in relation to their center and light effects can be modified.
The ability to manage and create sources and character is also unlimited. The CHAR command can use any source and display it in 256 different sizes. Characters can be colored, they can take on different graphic matrices and you can determine the direction of printing (up, down, left, right, high-left...). Finally, you can rotate or reverse the characters using a mode similar to the control code. This command also offers other operating options, including 160 characters per line. No modern graphic system can be said to be complete without using the mouse and windows, and BASIC 8.0 is no exception. The windows can be opened anywhere on the screen and all commands and changes are assigned to the newly opened window. For example, if you set the command that deletes the screen, only the contents of the window are deleted. The MOUSE command includes a mouse 1351 driver and a joystick driver. Once activated (using IRQ techniques), it follows the mouse and joystick movements and, through the MOUSE function, locates the X and Y coordinates of the cursor. Since the C-128's 80 columns do not have sprites available, something similar needed to be done. The PTR command creates a pointer capable of functions similar to those performed by a sprite, which can be positioned anywhere on the screen. There are sixteen pointer configuration options, 8 of which are already predefined. The programmer is thus able to create custom pointer definitions, as well as defining sprites in the composite mode. One of the most important aspects of BASIC 8.0 is the ability to support 1700 and 1750 expansion cartridges. Using the BUFFER command, data storage areas can be created in any 128 RAM bank, whether internal or external. Once created, these buffers can be used to store and recall a wide range of data structures.
Such structures may be made up of particular font-character sources, brushes, matrices or marks. More than 192 structures can be stored in memory at the same time. Directly supported printers are about a dozen: Commodore, Epson, Panasonic, Mannesman Tally, Seikosha, Olivetti, Gemini, Canon and others. The manual contains the assembly source codes of all printer drivers in their entirety, so that drivers for printers that are not supported directly can be easily produced by LM programmers. This command also allows page rotation, variable character density and multiple image size.
In addition to the above, many other commands have been implemented that help create the exceptional power of Basic 8.0. Controls such as SCROLL (which allows scrolling in 8 different directions), ZOOM (display a brush in expanded form), SCALE (converts the standard pixel display into a larger logical display) and FLASH (it flashes an area up to 255 times) can be used in programs to create incredible effects. However, I would like to mention a few more details concerning BASIC 8.0.
Since this program is intended for the realization of other programs with features never seen before on a C-128, it is obvious that programmers who have purchased the system want to distribute or perhaps sell their products. To meet this need, we have developed and developed RunTime: a special module (included in the package without additional price) that allows registered users to distribute their programs without risk of copyright infringement. RunTime programs can run, but not be listed or edited. There are no royalties to be paid for using this system.
Another feature we wanted to have our package is the possibility to start using it even before we learned the language. This is why we have developed an application program for colour drawing, BASIC PAINT, written entirely in BASIC 8.0. The program is managed by mouse and icons and, of course, it is able to compare with all the products of this type available on the market. You can use it as a standard graphic package or as a tool to create brushes, images and matrices for use in your programs in BASIC 8.0. BASIC PAINT is also included in the BASIC 8.0 package, runs on every 128 and supports mouse, joystick, printer and RAM expansions.
Before I finish, let me add something: David and I hope this program will prove to all software creators that the 128 is an exceptional machine with very special capabilities and possibilities. BASIC 8.0 can therefore represent a milestone in the history of this computer, which, we hope, will stimulate the development of dedicated software, and created specifically for this machine, and no longer only of transpositions of existing programs already adapted.
And now the project!!
First of all, let's start with the necessary components:
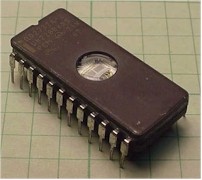
An EPROM 27256 or 27C256. A component that is a little difficult to find even if, with a bit of luck, it is still possible to buy small lots on e-bay (www.ebay.it ).
·
Eprom 27256 Photos
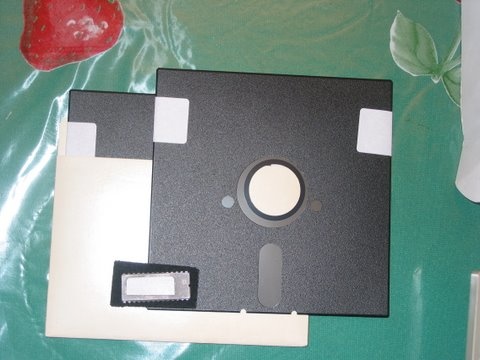
Alternatively and luckily you can still find the original Walrusoft package (EPROM + 2 Floppy) on (www.ebay.it). packagewalrusoft
For the less fortunate, you can take the binary file of the EPROM content of the following
An Eprom programmer will also be needed. For this component I strongly recommend the use of the Willem Eprom programmer (Explanations and links on http://www.willem.org/)
Finally, the two floppies will be necessary and I will provide the following link (in both D64 format and content)
Equipped with an original monitor for the Commodore 128...... or a good soldering iron and some components to build a RGBI-SCART converter to display the 80-column video signal on a common colour television (the project is in the following article)
Let's start!!
Start by inserting the EPROM 27256 into the motherboard Function ROM socket
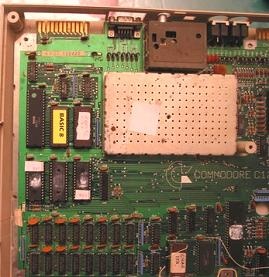
The ROM is the one labelled in yellow "BASIC 8".
Be careful: Care must be taken to insert the ROM on the socket!
First of all, you should avoid wearing synthetic clothing that can accumulate too much electrostatic charge and destroy the most delicate components.
I can suggest a very simple solution to avoid risks. Before inserting the ROM on the socket (do not laugh it really works!), place bare feet directly on the floor.
This should reduce your static charge to non-hazardous ROM values.
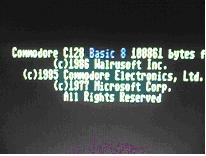
At this point it must be said that Basic 8 works exclusively with the C128's 80 column video output.
So it's useless to try with the RF output (adapted to the antenna input of your TV) - you wouldn't see anything!
This output only allows 40 characters per line and is disabled by Basic 8.
The few lucky ones of you who own an old CGA monitor can get ready to do a few tests right away.
For those who are not so lucky, there are two solutions:
Purchase a RGBI-SCART conversion cable to connect the C128 directly to your TV's SCART socket (C128-Kombikabel/SCART)
Build one with a little patience. Just a minimum of familiarity with the soldering iron and components (or having a friend who knows how to do it).
It's not difficult if you have the patience to follow me.
The interface circuit diagram that allows to visualize on a common TV the output with 80 columns and the 40 of the C128 is partially derived and reengineered from other diagrams on the Internet:
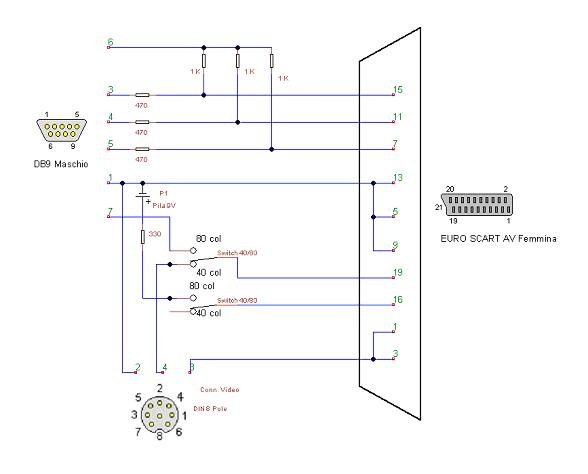
To make the adapter, you will need to procure these components:
- One EURO SCART connector Panel mount
- One 9-pole DB connector complete with lock
- One DIN 8-pin male connector
- 50cm of shielded stereo cable
- 50 cm of 5-pole cable + screen
- a double diverter switch
- 3 1000 Ohm? watt resistors
- 3 resistors of 470 Ohm? watt
- 1 resistance of 330 Ohm? watt
- 1 battery of 9 volts
- 1 "millephor" sticks for mounting
- 1 plastic box with battery compartment
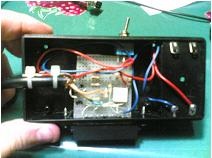
For the realization I recommend you to start cutting the base of the yarns to make them assume a footprint slightly less than the width of the SCART socket. Cut the other side of the plate as well, if necessary, until it is close to the box width. Solder one of the sides of the feet of the SCART socket to the multihole plate. Weld the double diverter switch to the opposite side of the base.
RGBI-SCART Scatolina RGBI-SCART you will get an assembly of a shape similar to that shown in the photo
The SCART socket and diverter switch will make the assembly more robust.
Solder the resistors and make all the connections indicated in the diagram. Finally, connect the stereo shielded cable to the 8-pin DIN connector and the 6-pin shielded cable to the 9-pin D SUB connector.
At the end, connect the contacts of the battery at 9 volts and then close the box.
Carton Converter Rgb Scart Converter
At the end of the assembly, the result should be as shown in the figure:
Finally connect the Drive 1541, insert the floppy disk labeled "Run Time disk" and turn on the drive first and then the C128. carton rgb def.
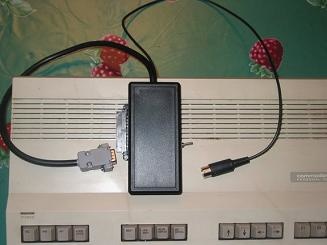
The machine will start to boot from floppy and after several screen guided steps........
The final result is visible in the photo below! (three months of hard work!!...)